Your shopping cart is currently empty.
Care and Maintenance
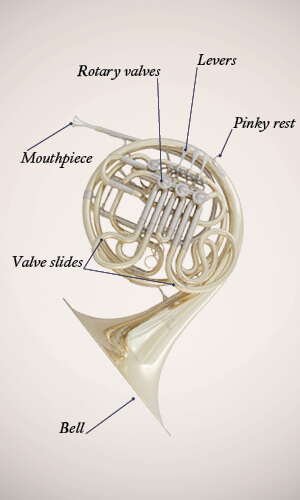
How to care for your
French Horn
Assembly
- Place the case flat on the floor with the flat hinges facing you and the bell on your left side (if your case opens from the flat side, have the bell on your right).
- With your right hand, firmly pick up the instrument by the very top tubing, located between the bell flare and the leadpipe. Avoid picking the instrument up by any tuning slides.
- Gently place the mouthpiece into the leadpipe, giving it a gentle twist. Do not slap or pound the mouthpiece in any way.
Daily Maintenance
- Be sure to get any food debris out of your mouth before playing.
- Be careful with your instrument and do not let anyone else play it. It's best to always set your trumpet down back into your case when setting it down, even for a moment.
- Always keep your instrument in its case or on a secure instrument stand when you are not playing it; don't lean it against a wall where it may fall over, or set it on a chair where it may get knocked off, or leave it on the floor where someone might step on it
- Avoid putting anything into your case that it was not designed to hold because the pressure from excess items can damage the instrument.
- Keep your mouthpiece secure inside the case. Leaving it loose in the case can cause the dents and other damage to the instrument.
- Empty your horn of water often by opening the water key. Some models of horn lack a water key, in this case remove the main tuning slide closest to the leadpipe and invert it, allowing the condensation to flow out. You'll likely need to empty other slides (even if you have a water key). Consult with your teacher about when and which slides you should empty.
Weekly Maintenance
Lubricating your rotors is a more delicate process than the oiling of trumpets or tuba valves or the slides of trombones, always take care to not use too much oil or it will get on the outside of your horn rather than the inside. There are three points where you'll need to oil with two different types of lubricant. For your first time, have your lesson teacher, another experienced hornist, or a brass technician demonstrate the process for you.
- Gently Put the horn on a sturdy table or very carefully on your lap.
-
For the Upper Spindle use bearing and linkage or spindle oil.
- Have the horn facing up.
- Remove the rotor caps.
- Wipe away any grime or excess oil from the stop plate and spindle with a paper towel or microfiber cloth.
- Place a couple drops of linkage/bearing oil on top of the spindle.
- Press the lever several times to turn the valve, helping the oil flow down the valve.
- Replace cap, threading it until snug.
- For the Lower Spindle continue using bearing & linkage or spindle oil.
- Turn over the horn so the caps are facing the table or your lap.
- Locate the small groove between the bumper plate, and the stopper arm. When you press the lever, you should see the spindle turn through this small gap.
- Place a drop of linkage/bearing oil onto the spindle.
- Press the lever several times to turn the valve, helping the oil flow down the spindle.
- For the Inner Valve use rotor oil instead.
- Flip the horn so the bell is in the air and the valve section tuning slides are facing straight up.
- Remove the 3 tuning slides that connect to the valves (if using a double horn only removing the F side slides are necessary).
- Carefully put a couple drops of rotor oil down the center of the outer slide tubes, avoid as best you can hitting the sides of the tubes with the oil.
- Press the lever several times to turn the valve, helping disperse the oil around the rest of the valve.
- Repeat for each valve.
- Replace the slides to their respective valves.
- Blow through the horn, there may be excess oil inside, empty as you would any water from the horn.
Cleaning your mouthpiece: Run your mouthpiece under warm water and scrub with a bit of dish soap and the mouthpiece brush that came in your care kit. Dry it off with a bit of paper towel.
Month & Quarterly Maintenance
It is inadvisable for the player to attempt to clean their own horn indepthly due to the complex and highly precise nature of the instrument's inner workings, particularly the rotors. That said, a light cleaning several times a year can include the following:
- Cleaning the leadpipe:
- Remove the main tuning slide.
- Apply a small drop of dish soap to the horn snake brush included in your care kit.
- Push the smaller end into the tuning slide receiver until it comes out the leadpipe.
- Pull the snake completely through the leadpipe to the brush so the other end also goes through.
- Rinse the brush and the leadpipe with warm water.
- Repeat the process a couple times until the brush is pretty clean after going through.
- Wipe off the grease from the tuning slide and reapply a fresh coat, then return it to the instrument
- Cleaning the individual tuning slides:
- Remove each tuning slide, keeping them in order to make sure they get placed back into the instrument correctly.
- Submerge them in warm, soapy water and let them soak for 10-15 minutes.
- Scrub and rinse each one with your snake on the inside and a rag or sponge on the outside.
- Set them out to dry for about an hour.
- Apply a thin coat of slide grease or gel to the slides and return them to the corresponding slide receiver.
Yearly Maintenance
Once a year, your instrument must be serviced by a qualified technician. Despite any precautions you may have made throughout the year following your maintenance routine schedule, your instrument will still need a cleaning to remove any scale buildup that may be forming. Following these steps will help keep your instrument working properly for many years to come!
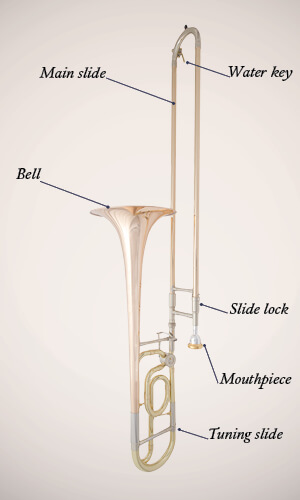
Trombone
Assembly
- Place the case flat on the floor, making sure the manufacturer’s logo is on top. If there is no logo, look to make sure that the latches flip up, or that the widest portion of the case is at the bottom.
- After opening up the case, undo any fasteners that may be securing the instrument.
- Remove the slide from the case, grasping both bars of the outer and inner slide to insure that you will not drop either part.
- Once the slide is secure, disengage the slide lock.
- Without dropping either part, carefully grasp the bar of the inner slide tube with your left hand and the bar of the outer slide tube with your right hand. Move the slide back and forth and assess its function. Lubricate as needed. *See below.
- Once finished, re-engage the slidelock.
- While holding the slide firmly in your right hand, use your left hand to retrieve the bell by picking it up from the case by the bell stem.
- Connect the bell to the slide and tighten the threads 90% of the way, leaving enough room for adjustments.
- Place the mouthpiece in the leadpipe.
- Hold on the instrument securely in your right hand, and adjust the angle between the bell and the slide. The rim of the bell should be about two fingers away from the top tube of the slide.
- Tighten the threads connecting the bell to the slide until the threads are snug.
After Use Care
- If time allows, let the instrument cool down for a few minutes to allow the moisture to condense.
- Remove moisture from the instrument by opening the water key at the bottom of the handslide with your right hand, and blowing fast air through the instrument.
- Push the tuning slide(s) back in all the way.
- Undo the threads and remove the bell, placing it securely in the case.
- One last time, remove any additional moisture from the handslide through the water key.
- Remove the mouthpiece from the handslide, and wipe out any moisture with a clean rag before placing it in the case.
- Place the handslide in the case.
- Before securing the fasteners around the instrument, use a microfiber cloth to quickly wipe down any fingerprints or grease that may be present on the instrument, paying special attention to any parts you hold onto.
- Secure the fasteners, close the case, and secure the latches.
Note: This helps prevent the tuning slides from getting stuck.
Regular Maintenance
Carefully maintaining your instrument on a regular basis will help prolong the life of your instrument, keep service costs to a minimum, and prevent any mishaps from happening that may occur during a crucial moment of a performance. Remember to always handle your instrument with care to prevent any unnecessary wear or damage. It is important to note that the following routine is not a replacement for any services offered by a repair technician. In addition to the following, a yearly service by a technician will ensure that your instrument will be working well for many years to come.
Daily
- Brush your teeth prior to playing. This will help prevent the acidity in your mouth from damaging the instrument and keeping the build up of debris to a minimum.
- Spray the tubes of the inner hand slides with a mist of water before playing, and as needed while in use. This interacts with the hand slide lubricant, keeping it slick and hydrated. Distilled water is preferred, but clean tap water will do.
- Remove moisture from the inside of the instrument, following the procedures outlined above.
- Wipe down the instrument and mouthpiece after each time you play.
Weekly
-
Clean mouthpiece.
- Using a mouthpiece brush designed specifically for instrument, apply a mild dish soap to the bristles, similar to how you would to a toothbrush when brushing your teeth.
- Under warm, running water, scrub vigorously the inside and outside of the mouthpiece
- Occasionally inspect the mouthpiece to make sure all debris has been removed.
- Take note of any crimps or dents of the mouthpiece that may need to be repaired.
- In the event that you find any damage done to your mouthpiece, or there is some debris that you are unable to remove, schedule an appointment with a technician at your earliest convenience.
-
Applying hand slide lubricant.
- Using a soft rag, remove the old slide cream from the inner hand slide tubes by wrapping it around one of the tubes, and firmly sliding the rag from the handle to the end. Do this to both tubes until both services are clean and dry.
- Apply a light, even layer of hand slide cream to the “collars” or raised portion of the inner hand slide tubes, located at the very bottom.
- Lightly mist up and down both tubes with a spray of water.
- Hanging onto the recently lubricated inner tubes with your left hand, take the outer hand slide in your right hand and put them together.
- Slide the tubes back and forth and assess its speed.
- Apply either slightly more lubricant or water to the slide until desired speed is met.
Note: If the slide does not seem to be moving properly, wipe off all of the slide grease again, and clean the outer slide tubes as detailed below. Relubricate and try again. If that does not alleviate the issue, schedule an appointment with a repair technician as soon as possible.
-
Applying valve oil to the thumb valve
(F attachment and bass trombones only).
-
There are 3 bearing surfaces on a rotor valve that need to be
lubricated with valve oil. A simple piston or rotor oil will
work for all 3. But it is recommended that you use rotor oil for
the inside of the valve, and linkage/bearing oil on the top and
bottom spindles.
-
Upper Spindle
- Gently place the bell on a sturdy surface in front of you, with the valve cap facing up.
- Remove the cap, revealing the top bearing spindle.
- Wipe any debris that may have formed on top of the spindle.
- Place a single drop of linkage/bearing oil on top of the spindle.
- Press the lever several times to turn the valve, helping the oil flow down the valve.
- Replace cap, threading it until snug.
-
Inner Valve
- Firmly hold the bell, pointing it up.
- Carefully drop a single drop of rotor oil down the “gooseneck,” or pipe that connects the bell to the hand slide. Try not to hit the sides.
- Press the lever several times to turn the valve, helping disperse the oil around the rest of the valve.
-
Lower Spindle
- Gently place the bell on a sturdy surface in front of you, with the valve cap facing down, revealing the bottom spindle that is connected to either the mechanical or string linkage.
- Locate the small groove between the bumper plate, and the stopper arm. When you press the lever, you should see the spindle turn through this small gap.
- Place a drop of linkage/bearing oil onto the spindle.
- Press the lever several times to turn the valve, helping the oil flow down the spindle.
- Wipe down any excess oil before playing.
-
Upper Spindle
-
There are 3 bearing surfaces on a rotor valve that need to be
lubricated with valve oil. A simple piston or rotor oil will
work for all 3. But it is recommended that you use rotor oil for
the inside of the valve, and linkage/bearing oil on the top and
bottom spindles.
Monthly
-
Cleaning the hand slide.
- Remove the inner handslide from the outer handslide, and carefully submerge them both in a tube of warm, soapy water. Use a grease dissolving dish soap such as Dawn or Ajax.
- Using a cleaning snake made specifically for trombone, carefully but vigorously scrub both inner and outer tubes.
- Rinse thoroughly.
- Dry the outer surface of both tubes with a microfiber cloth.
- Carefully set both tubes out to allow the insides to dry.
- Once dry, lubricate and assemble as normal.
-
Cleaning the bell.
- A straight tenor trombone bell can be cleaned in the same manner as the handslide.
Note: It is not recommended to clean the bell section of an F attachment trombone or bass trombone yourself, due to the sensitivity of the rotor valves. However, cleaning the tuning slides with the landslides and in the same manner will help keep things clean.
-
Lubricating the tuning slides.
*Necessary only after a monthly cleaning, or as needed.
- Make sure tuning slides are dry before applying grease.
-
Using the tip of the slide grease applicator, or your finger if
the grease is in a jar, apply a small ring of grease around the
edge of the very tip of the tuning slide.
- If the slide is longer than 6 inches, it may be necessary to apply another ring halfway up the slide tube.
- Simply insert the slide back into its proper tube, and move back and forth to distribute the grease.
- If the draw is uneven, it feels dry, you may need to apply more grease.
- If the draw is too tight, where the slide doesn’t move very easily, try applying a small amount of valve oil to the freshly greased surface.
- If the slide is still not moving properly, schedule an appointment with a technician to assess if any work may need to be done on the instrument.
- Once completed, wipe off any excess grease.
Yearly
Once a year, your instrument should be serviced by a qualified technician. Despite any precautions you may have made throughout the year following your maintenance routine schedule, your instrument will still need a cleaning to remove any scale buildup that may be forming. Following these steps will help keep your instrument working properly for many years to come!
Trumpet
ASSEMBLY: HOW TO PUT YOUR TRUMPET TOGETHER
- Carefully remove your instrument from its case and set it on a flat, stable surface.
- Insert the mouthpiece into the lead pipe with a gentle twist. DO NOT hit or jam the mouthpiece into the lead pipe. NOTE: In the event that your mouthpiece gets stuck in the trumpet, please DO NOT attempt to remove it yourself. It's very easy to cause damage to the leadpipe and braces if inappropriate means of removal is employed. The mouthpiece should be removed by your teacher or by the Brass Bell repair shop.
- Make sure all slides and valves are moving freely and without any resistance.
REGULAR MAINTENANCE
- Be sure to get any food debris out of your mouth before playing.
- Be careful with your instrument and do not let anyone else play it. It's best to always set your trumpet down back into your case when setting it down, even for a moment.
- Always keep your instrument in its case when you are not playing it. Never put anything into your case that it was not designed to hold because the pressure from papers or music can damage the instrument.
- Keep your mouthpiece secure inside the case. Leaving it loose in the case can cause the dents and other damage to the instrument.
DAILY MAINTENANCE
- Release the condensation from the instrument by opening the water key and blowing air into the instrument. Empty the condensation onto the floor. Do this every few minutes of playing the instrument.
- Oiling your valves: unscrew the valve cap and pull the piston out of its casing about half way, a little past the spring. Apply 2-3 drops of valve oil on the face of the piston below the spring. Next gently put the piston back into the casing with a slight rotation until you hear a click, also making sure that the number on the piston (1,2, or 3) is facing away from the bell and toward the leadpipe. Let us know if you want a demonstration and a Brass Bell Staff member or Brass technician can help.
WEEKLY MAINTENANCE
- Flush your mouthpiece with dish soap and warm water, then wipe off with a paper towel.
- Remove your tuning slides and wipe off the grease with a paper towel. Replace with fresh grease or slide gel. [for advanced players: add a touch of valve oil to the 1st and 3rd slides if you engage them during playing].
QUARTERLY MAINTENANCE - CLEANING
- READ ALL THE STEPS BEFORE BEGINNING
- Prepare your materials for the cleaning:
- The cleaning brush from your care kit
- A tub or bin of warm soapy water (dish soap works well) [be very careful if using a sink to not let any parts get lost down the drain]
- 2 towels [lay one on a table or counter near your water tub]
- Your instrument
- Valve Oil
- Slide Grease
- Carefully remove the slides, pistons, and bottom valve caps from the instrument. Take the valves out one at a time and lay them in order on a towel (your valves and slides must go back to the correct part of the instrument or it won't function properly).
- Put the slides, valves, and the body of the trumpet into a bin or tub of warm soapy water (not too hot!) and let it soak for 10 - 15 minutes.
- Rinse all the parts out one at a time thoroughly, but gently. Brush the inside of the slides and the trumpet with your cleaning brush.
- Place the parts back in order as you go on your towel and allow them to dry for about an hour. Dry off the outside of the trumpet with another towel. Wipe down your mouthpiece with a paper towel.
- Once everything is dry, lubricate each slide with grease or gel and return it to the corresponding slide receiver on the trumpet. Move it in and out a few times to spread the grease evenly.
- Oil the pistons and put them back in one at a time. [each valve has a number, make sure the one closest to the leadpipe is number 1, then 2 in the middle, and three closest to the bell, have the numbers face the leadpipe as you put them in] Spin the pistons a bit as you return them to the casings, you should hear a click as they set in place.
- Play the trumpet to make sure everything is functioning properly. If you don't think you put it back together correctly, bring it to the store and have one of our technicians help you out.
YEARLY MAINTENANCE
Once a year, your instrument must be serviced by a qualified technician. Despite any precautions you may have made throughout the year following your maintenance routine schedule, your instrument will still need a cleaning to remove any scale buildup that may be forming. Following these steps will help keep your instrument working properly for many years to come!
Baritone & Tuba
ASSEMBLY: HOW TO PUT YOUR INSTRUMENT TOGETHER
- Carefully remove your instrument from its case and set it on a flat, stable surface.
- Insert the mouthpiece into the lead pipe with a gentle twist. DO NOT hit or jam the mouthpiece into the lead pipe. NOTE: In the event that your mouthpiece gets stuck in the trumpet, please DO NOT attempt to remove it yourself. It's very easy to cause damage to the leadpipe and braces if inappropriate means of removal is employed. The mouthpiece should be removed by your teacher or by the Brass Bell repair shop.
- Make sure all slides and valves are moving freely and without any resistance.
DAILY MAINTENANCE
- Be sure to get any food debris out of your mouth before playing.
- Be careful with your instrument and do not let anyone else play it. It's best to always set your trumpet down back into your case when setting it down, even for a moment.
- Always keep your instrument in its case when you are not playing it. Never put anything into your case that it was not designed to hold because the pressure from papers or music can damage the instrument.
- Keep your mouthpiece secure inside the case. Leaving it loose in the case can cause the dents and other damage to the instrument.
- Release the condensation from the instrument by opening the water key and blowing air into the instrument. Empty the condensation onto the floor. Do this every few minutes of playing the instrument.
- Oiling your valves: unscrew the valve cap and pull the piston out of its casing about half way, a little past the spring. Apply 2-3 drops of valve oil on the face of the piston below the spring. Next gently put the piston back into the casing with a slight rotation until you hear a click, also making sure that the number on the piston (1,2, or 3) is facing away from the bell and toward the leadpipe. Let us know if you want a demonstration and a Brass Bell Staff member or Brass technician can help.
WEEKLY MAINTENANCE
- Flush your mouthpiece with dish soap and warm water, then wipe off with a paper towel.
- Remove your tuning slides and wipe off the grease with a paper towel. Replace with fresh grease or slide gel. [for advanced players: add a touch of valve oil to the 1st and 3rd slides if you engage them during playing]
QUARTERLY MAINTENANCE - CLEANING
- READ ALL THE STEPS BEFORE BEGINNING
- Prepare your materials for the cleaning:
- The cleaning brush from your care kit
- A large utility sink or bathtub into which your whole instrument can fit.
- Several towels [lay one on a table or counter near your water tub]
- Your instrument
- Valve Oil
- Slide Grease
- Carefully remove the slides, pistons, and bottom valve caps from the instrument. Take the valves out one at a time and lay them in order on a towel (your valves and slides must go back to the correct part of the instrument or it won't function properly).
- Put the slides and valves into a bin or tub of warm soapy water (not too hot!) and let it soak for 10 - 15 minutes.
- Put a bit of dish soap on your cleaning brush and scrub the inside of your slide receivers, leapipe, and valve casing (careful not to scratch the insides of the valve casings). Rinse the brush and get more soap as the brush gets dirty.
- Rinse out all the areas you just scrubbed thoroughly, then have an adult help you rotate the instrument several times towards the bell [this will remove the water from the inside of the instrument]. Carefully set the tuba down to dry on a large towel out of the way so it won't get bumped. Dry off the inside of the bell and the whole exterior with a towel or two.
- Remove the slides and valves from the soak and rinse all the parts out one at a time thoroughly, but gently. Brush the inside of the slides with your cleaning brush.
- Place the parts back in order as you go on your towel and allow them to dry for about an hour. Wipe down your mouthpiece with a paper towel.
- Once everything is dry, lubricate each slide with grease or gel and return it to the corresponding slide receiver on the trumpet. Move it in and out a few times to spread the grease evenly.
- Oil the pistons and put them back in one at a time. [each valve has a number, make sure the one closest to the leadpipe is number 1, then 2 in the middle, and three closest to the bell, have the numbers face the leadpipe as you put them in] Spin the pistons a bit as you return them to the casings, you should hear a click as they set in place.
- Play the tuba to make sure everything is functioning properly. If you don't think you put it back together correctly, bring it to the store and have one of our technicians help you out.
YEARLY MAINTENANCE
Once a year, your instrument must be serviced by a qualified technician. Despite any precautions you may have made throughout the year following your maintenance routine schedule, your instrument will still need a cleaning to remove any scale buildup that may be forming. Following these steps will help keep your instrument working properly for many years to come!