Your shopping cart is currently empty.
Care and Guides
How to care for your
Saxophone
Assembly
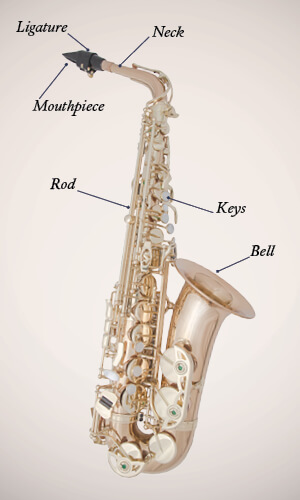
- Before assembling the saxophone, start by placing the reed in your mouth to begin soaking.
- Place the neck strap around your neck.
- Grab the saxophone by the bell, and fasten it to the neck strap.
- Place the neck onto the saxophone, placing the ring around the octave key.
- Slide the mouthpiece onto the neck cork.
- Grease neck cork if mouthpiece does not go on easily.
- Place and fasten the reed to the mouthpiece.
- Be careful as to not overtighten the ligature as the screws can snap.
When you have finished playing
Important to do EVERY TIME you play.
- Start by removing the reed and lightly dabbing it dry before placing it back in a reed guard.
- With a microfiber cloth, wipe down the inside and outside of the mouthpiece and neck, removing as much moisture as possible.
- Place the ligature onto the mouthpiece, and the mouthpiece in the mouthpiece cap before placing them into the instrument's case.
- Swab out the instrument by inserting the swab through the bell, and pulling it gently through the body of the instrument.
- Do this multiple times to remove as much moisture as possible. This will keep the instrument clean, and will prolong the life of the pads, keeping them working properly for far longer than if they were not swabbed.
- Remove neck strap
- Place the end plug in the body of the instrument to protect the octave key, and properly place the instrument in its case.
- Note: Be sure not to place any excess items, such as music, in the saxophone portion of the case with the instrument. The case is meant for holding the instrument. Nothing more. Music placed on top of the instrument will bend the rods and keys, causing the instrument to not work properly. Most cases have a small space for things like reeds and swabs.
Regular Maintenance
To be done regularly in conjunction with what's listed above.
- Brush your teeth prior to playing. This helps prevent the acidity in your mouth from damaging the instrument. If you aren't able to brush your teeth before playing, drink some water instead.
- Wipe down the instrument of fingerprints and moisture.
- If any pads are damp, insert pad cleaning paper into the space between the tone hole and the pad and then lightly press the key a few times. Repeat this 2 or 3 times while using different parts of the cleaning paper. To keep pads clean, don't eat candy or chew gum before playing and never while playing.
- Occasionally scrub out the mouthpiece using dish soap and a mouthpiece brush.
- Handle the instrument with care. The slightest bump or dent can throw the keys out of alignment.
- Schedule a yearly appointment with a qualified technician, to assure everything is working properly.
Recommended Supplies
- Swab
- Mouthpiece Brush
- Microfiber cloth
- Cork Grease
- Reed Guard
- Multiple Working Reeds
- Pad Cleaning Paper
CLARINET / OBOE
How to put your Clarinet/Oboe together

- Begin by joining the two major joints together, do your best not to grip any of the keys while gently twisting the joints into place. There are metal tabs that extend just beyond the edge of either joint that align to form the bridge key which articulates specific keys across the break.
- Next affix the bell to the end of the lower joint, followed by the barrel to the top of the upper joint. Once these are all correctly joined, insert the mouthpiece into the barrel and tightly secure a reed to the mouthpiece using the ligature screws, you may need to loosen these screws to make room when putting on a reed.
When You are Done Playing
- Wooden clarinets and oboes are especially susceptible to damage from moisture. It is very important to wipe away the moisture inside your clarinet after every use. Not swabbing out the moisture leads to the instrument getting dirty more quickly and can even result in damage or cracks in the body.
- The mouthpiece should also be cleaned thoroughly after each use to avoid any residue buildup. A mouthpiece cleaning brush or a second, small swab is sufficient for cleaning the mouthpiece after use.
- Do your best to avoid exposing your clarinet to extreme temperature changes. Never leave your clarinet in a parked car for long periods of time, especially on particularly hot or cold days.
Daily Maintenance
- If any pads are damp, insert pad cleaning paper into the space between the tone hole and the pad and then lightly press the key a few times.
- Repeat this 2 or 3 times while using different parts of the cleaning paper. To keep pads clean, don't eat candy or chew gum before playing and never while playing.
- Do not let anyone else play your instrument. The clarinet is a delicate instrument, which must be handled carefully. If you must set it down during class, put it on a flat surface with the keys up. Never leave your clarinet on a music stand, or balanced upright on the bell without a secure instrument stand.
Weekly Maintenance
- Clean all the tone holes weekly using tone hole cleaners. These are very similar to pipe-cleaners and can be bent into shape to make for easier cleaning.
- Silver in the keys will discolor over time, this does not pose danger to the Clarinet, but if you want to keep your keys looking shiny and silver, gently wipe them with a Silver Polishing Cloth.
- To keep the keys moving smoothly and quietly, Medium Key Oil must be applied to the contact points of all moving components. It is recommended to do this at least once a month, if you play a lot or have sweaty hands you may want to oil your keys as often as every two weeks. Apply Key Oil sparingly and be careful to wipe away any excess oil to avoid getting any on the body of the instrument.
Quarterly Maintenance
- Cork grease needs to be occasionally applied to the joint corks to keep them from drying out and crumbling. If a joint is very stiff and you are having trouble getting the clarinet together, rubbing a little grease into the cork can help loosen things up and make joints come together more easily. Use very sparingly and be very careful to not apply too much as excess grease can actually make the cork deteriorate faster.
- Inspect the keys on your instrument to make sure nothing is dented or bent, and that none of the screws are coming undone. If any of these problems arise, it is best to let a professional technician repair your instrument.
Yearly Maintenance
- For Wooden clarinets and oboes in particular, it is very important to invest in some form of humidity control. This is especially important during our very dry winters. Humidity releasing sponges such as the “DampIt” product line, or humidity regulating Desiccant compounds like “Boveda” products are both excellent ways to drastically increase the lifetime of your clarinet. Sponge Products generally need to have water applied to them every few days, while desiccant packets usually need to be replaced every 6-9 or whenever the compound becomes stiff.
- Once a year, your instrument must be serviced by a qualified technician. Despite any precautions you may have made throughout the year following your maintenance routine schedule, your instrument will still need a cleaning to remove any scale buildup that may be forming.
- Following these steps will help keep your instrument working properly for many years to come!
Supplies Needed
- Clarinet/Oboe Swab
- Small Swab or Brush for Mouthpiece
- Cork Grease
- Medium Key Oil
- Tone Hole Cleaners
- Pad Paper
- Polishing Cloth
Flute
How To Put Your Flute Together
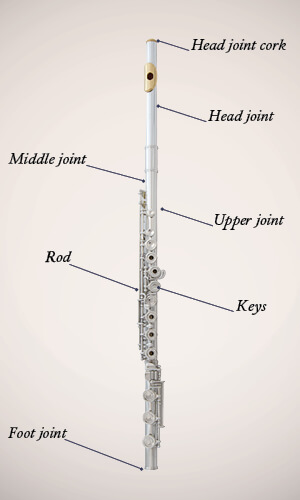
- Hold the body of the flute where there are no keys and gently twist the head joint into place.
- Line up the tone hole in the head joint with the keys on the body.
- Gently twist the foot joint into place. The keys on the body should line up with the rod on the foot joint.
- The sections of the flute are meant to fit together without using any grease. If you have difficulty fitting the sections together, clean them.
When You Have Finished Playing
- Swab your flute every time you finish playing. Take your flute apart.
- Thread a small piece of lint-free cloth (a handkerchief works great) through the slot in the cleaning rod. Be sure to tuck the end of the cleaning rod into the cloth and wrap the cloth around the length of the cleaning rod so that as you push it through the instrument the metal rod does not scratch the flute. Leaving moisture in the flute will cause your pads to deteriorate.
- Always keep your flute in its case when you are not playing it. Never put anything into your case that it was not designed to hold because the pressure from papers or music can bend the rods and keys.
Daily Maintenance
- If any pads are damp, insert pad cleaning paper into the space between the tone hole and the pad and then lightly press the key a few times.
- Repeat this 2 or 3 times while using different parts of the cleaning paper. To keep pads clean, don't eat candy or chew gum before playing and never while playing.
- Gently use a polishing cloth to wipe off moisture and finger marks after playing, be careful not to apply pressure to any of the keys.
- Do not let anyone else play your instrument. The flute is a delicate instrument, which must be handled carefully. If you must set it down during class, put it on a flat surface with the keys up. Never leave your flute on a music stand.
Be careful when playing the flute not to bang or bump it, as it will dent easily and these dents are difficult and expensive to remove.
DO NOT adjust or twist the head joint cork button. This button changes the total pitch of the instrument and has been adjusted at the factory. If you have any concerns, please contact your teacher.
Weekly Maintenance
- Use a Silver cloth to shine your flute if any discoloration or tarnish starts to appear. If the metal is just dirty as opposed to tarnished, you may use a little rubbing alcohol on your cloth to remove any dirt or grime.
- Clean all the tone holes weekly using tone hole cleaners. These are very similar to pipe-cleaners and can be bent into shape to make for easier cleaning.
Quarterly Maintenance
- Inspect the keys on your instrument to make sure nothing is dented or bent, and that all screws are tightly in place. Tighten screws as needed.
- Using a Light Key Oil, sparingly apply oil to the joints of all moving parts. Press whichever key you are applying to a few times to help the oil work into the parts better. Be careful not to over apply the oil and wipe away any excess. Not oiling properly can lead to noisy and stiff keys.
- Make sure the joint connections are clean, never apply grease or any other product to the joint tenons as this can damage the flute and may even cause the joints to get stuck together.
- Check that the reflective backplate in the closed end of the flute is adjusted to the correct depth. Insert your cleaning rod backwards all the way into the flute. Then look into the hole in the faceplate to see a small grove near the end of the cleaning rod. This groove should align to bisect the opening of the lip plate. If the groove does not line up exactly with the middle of the opening, please have a technician or experienced band director assist you in adjusting the depth of the backplate as this part can be very delicate.
YEARLY
- Once a year, your instrument must be serviced by a qualified technician.
- Despite any precautions you may have made throughout the year following your maintenance routine schedule, your instrument will still need a cleaning to remove any scale buildup that may be forming.
- Following these steps will help keep your instrument working properly for many years to come!
Supplies Needed
- Flute, in good working order
- Cleaning rod & cloth (handkerchief is best).
- Polishing Cloth
- Tone Hole Cleaners
- Pad Paper
- Light Key Oil